Friday, October 1, 2010

Special K Crusted Chicken Breasts!


Before you completely disregard this recipe because of how odd it sounds - i urge you to give it a chance first before you totally deem this blog as useless.

I don't know if any of you have ever decided to have an extra healthy night and bake a plain chicken breast like I have - but it doesn't taste so great.  Especially when you try and avoid extra calories by putting no marinade, no cooking oils, no anything delicious on this chicken.  However,  I have now discovered a way to turn a plain old baked chicken breast (on a night where you are feeling particularly pudge) into something SO delish and SO healthy.  Breadcrumbs? No thanks.  I've got my breakfast cereal!

You will need (serves 2):
2 boneless skinless chicken breasts
2 cups Original Special K cereal (crushed)
1 cup plain yogurt
3-4 sprigs of rosemary (finely chopped)
salt and pepper to taste

Preheat your oven to 375 degrees F.  Mix together your "breadcrumbs", your rosemary and salt and pepper together in a plate.  Dip each chicken breast first into your yogurt (coverings the whole chicken) and then into the "breadcrumb" mixture.  Place on a baking sheet lined with parchment paper and bake in the oven for about 35 minutes.

Get the crispy crunchy taste and texture of crispy oven baked chicken but without all the extra calories you get from dipping in egg and regular breadcrumbs....... Not to say that that's not a delicious way to make chicken and if you are breading veal or making a special dinner for guests - I would still take this route.  But for a weekday healthy alternative that's sure to satisfy - try this one out!

Happy Eating!

xo

Chef Natty

Tuesday, September 28, 2010

It's beginning to look alot like.....THANKSGIVING!


Momentarily ignoring the fact that Christmas is only 13 weeks away (YEEEEEEE),  I can take this next week and a half to concentrate on another fan favorite holiday - Thanksgivingggggg!!!!  Oh Thanksgiving.... the turkey...the stuffing (or as hubs likes to call it - "dressing")... the cranberry sauce... it really is the most feel good meal I could ever imagine.  I remember the good ol' days back at Western when my good friend, let's call her Puff (that's actually what I call her), and I would waste away second year Physics classes by making long, descriptive (yes, we had diagrams) lists of everything we wanted to eat when we went home for Thanksgiving weekend.

In light of this magical season, last night I decided to participate in a presentation style technique cooking class at my favooorrritteee store on the planet - Williams Sonoma obvi.  The theme of course - Classic Thanksgiving dinner.  Since I have spent every Thanksgiving of my life thus far feasting on my parents holiday masterpieces, I have yet to tackle this ever important and outrageously delish meal myself (and I call myself a Chef? I know... its shameful).  Not only did the class end off with a plate to feast on - but I actually learned a ton of important info. that could be useful for making Thanksgiving dinner. SO... I decided what better to do with my newly gained turkey knowledge than share it with my faithful foodie blogger friends.

Below is the Williams Sonoma guide to making the perfect turkey!
First of all - you want to use a shallow roasting pan.  I know our nonnas and grandmothers have been using those huge deep roasters for years - but in order for the air to circulate around the meat to properly dry roast the bird - you want a shallow pan.  Then you will get that perfect brown caramelized crust on the outside - and a juicy bird on the inside.

Next - let's talk about brining.  Alot of people do not use this technique anymore but it can make for a very flavorful turkey.  You can buy a dry brine or you can roll up your sleeves and do the extra work for a wet brine.  What is a brine you may be asking? It's simply a salt solution / preservative/ seasoning with lots of salt and herbs etc....  For any turkey up to 20 lbs you can start with taking 3 cups of brine (Williams Sonoma sells an amazing one), add 3 cups of water and bring the mixture to a boil on the stove.  Then bring it down from a boil and let it come to room temperature.  Put the mixture in the fridge to chill and then put mixture in a brining bag (bigggg bags that will fit your turkey and seal up - again - Williams Sonoma has them).  Put the bag in a large bucket and then place your turkey in it along with 18 cups of water, 6 cups of apple cider or white wine (or both! feel free to improvise with flavors), and then seal up the bag.  Let the mixture brine for 6-24 hours (the longer you brine it - the most salt and flavor will enter the meat).  When you are done brining, rinse the bird off very well inside and out.

Next, create a compound butter by using a stick of butter, tbsp parsley, tbsp thyme and then lift the skin around the breasts  (without tearing) and rub all over the breasts.  Rub the rest of the bird alllll over the outside as well.  Tuck the wings under the back of the turkey, tie the legs together so it holds its shape.  Next, place the turkey on a rack in a the large shallow roasting pan and roast for 30 minutes at 400 degrees F,   Reduce the oven to 325 degrees F and continue roasting, basting every 30 minutes with the pan juices.  If the breast begins to cook too quickly, tent it loosely with foil.

After about 2 hours of total roasting time begin checking for doneness.  The breast should read 165 degrees and the theigh 175 degrees F.  Total roasting time depends on the size of the turkey.

NOTES ABOUT STUFFING
** Though alot of people prefer to stuff outside the turkey and cook their stuffing in a separate pan - alot of people still prefer to stuff the inside of their turkey the traditional way.  The reason some people stray away from this method because if it is not done properly, you risk letting bacteria form.  If you choose to stuff the inside of the turkey you must take the turkey out no earlier than 1 hour before you are cooking (if not brining), stuff the turkey RIGHT before you put it in the oven.  Be sure not to overstuff your turkey because it expands while cooking.  This method prevents bacteria from forming.  If you choose to stuff outside the turkey - make sure you are basting the stuffing often to keep it moist.

Did I lose you?  Are you still reading?  If you are I have one last gem for you.  A recipe for a fantastic variation on the classic mashed potatoes.  So so so so so delish.

Garlic Squashed Potatoes
You will need:
7-8 medium yukon gold potatoes, boiled and mashed / put through a ricer
1/3 bottle of Williams Sonoma Butternut Squash Puree
2 tsp Roasted Garlic Puree (can be purchased at Williams Sonoma or made at home simply by roasting your own heads of garlic and then making it a puree)
3 tbsp unsalted butter
1/4 cup heavy cream
1/3 cup milk
salt and pepper to taste

Warm butter with cream and milk in a saucepan.  Add cream mixture to mashed potatoes in a heat proof bowl.  Blend ingredients, adding salt and pepper to taste (do not over mix or potatoes become gluey)

Stay tuned for more Thanksgiving kitchen love this week!

xoxo

Chef Natty

Sunday, September 19, 2010

Baja Fish Tacos with a Mango Salsa & Cilantro Yogurt Sauce

I love love LOVEEEE fish tacos.  If anyone out there has not had the wondrous experience of these seriously delish little bundles of joy, I highly recommend you get on that - pronto.   The mix of fresh flavors is amazing.  You've got the nice marinated and spiced white fish, mixed with the tangy, fresh flavors of the mango relish and then topped with a tart and aromatic cilantro sauce - they are heaven.


You will need: (makes about 4-6 tacos)

3 fresh white fish fillets such as tilapia, halibut or snapper
Corn or Flour Tortillas
Mixed Greens
Cooking Spray

For the Marinade:
Juice of 1 large lime
3/4 cup of chopped cilantro
1 tsp cayenne pepper
Salt & Black Pepper
1-2 tbsp Cumin
EVOO

For the Salsa:
1 cup chopped/cubed mango
3/4 cup chopped cilantro
1/2 cup chopped red onion
1/2 cup chopped cucumber
Juice of 1 large lime
1 chopped tomato
pinch of cayenne pepper
EVOO

For the Sauce:
2 cups plain yogurt
3/4 cup cilantro
1/4 cup lemon juice
Pinch of salt

Place your fish in a large flat bottom bowl or plastic container, add your marinade and cover the fish thoroughly.  Cover and let marinade in the fridge for 1 hour.

In a bowl, mix together the ingredients for your sauce, cover and put it in the fridge to let the flavors set until ready to serve.

When the fish is marinated, heat up a pan on the stove with 1 tbsp of oil.  Add your fish (in batches if you have to) and cook for about 4 minutes on each side (if you are using Tilapia which is what i use for this recipe).  The exact cooking time will vary depending on the type of fish you use.  While the fish is cooking - mix together the ingredients for your salsa.   When the fish is cooked - remove from the pan and set on a plate to rest for 5 minutes.  While the fish is resting, in a separate pan, spray your corn or flour tortillas on both sides with some cooking spray and on medium heat, slightly brown the tortillas on each side (less than a minute per side)  Flake the fish apart with a fork after the 5 minutes.

Place some yogurt sauce on your warm tortilla, top with your fish, your mango salsa and some mixed greens and take a bigggg bite!

Enjoy my little foodie friends :)

xo

Chef Natty

Saturday, September 11, 2010

Braised Beef Shortribs with Garlic Whipped Potatoes and Green Beans


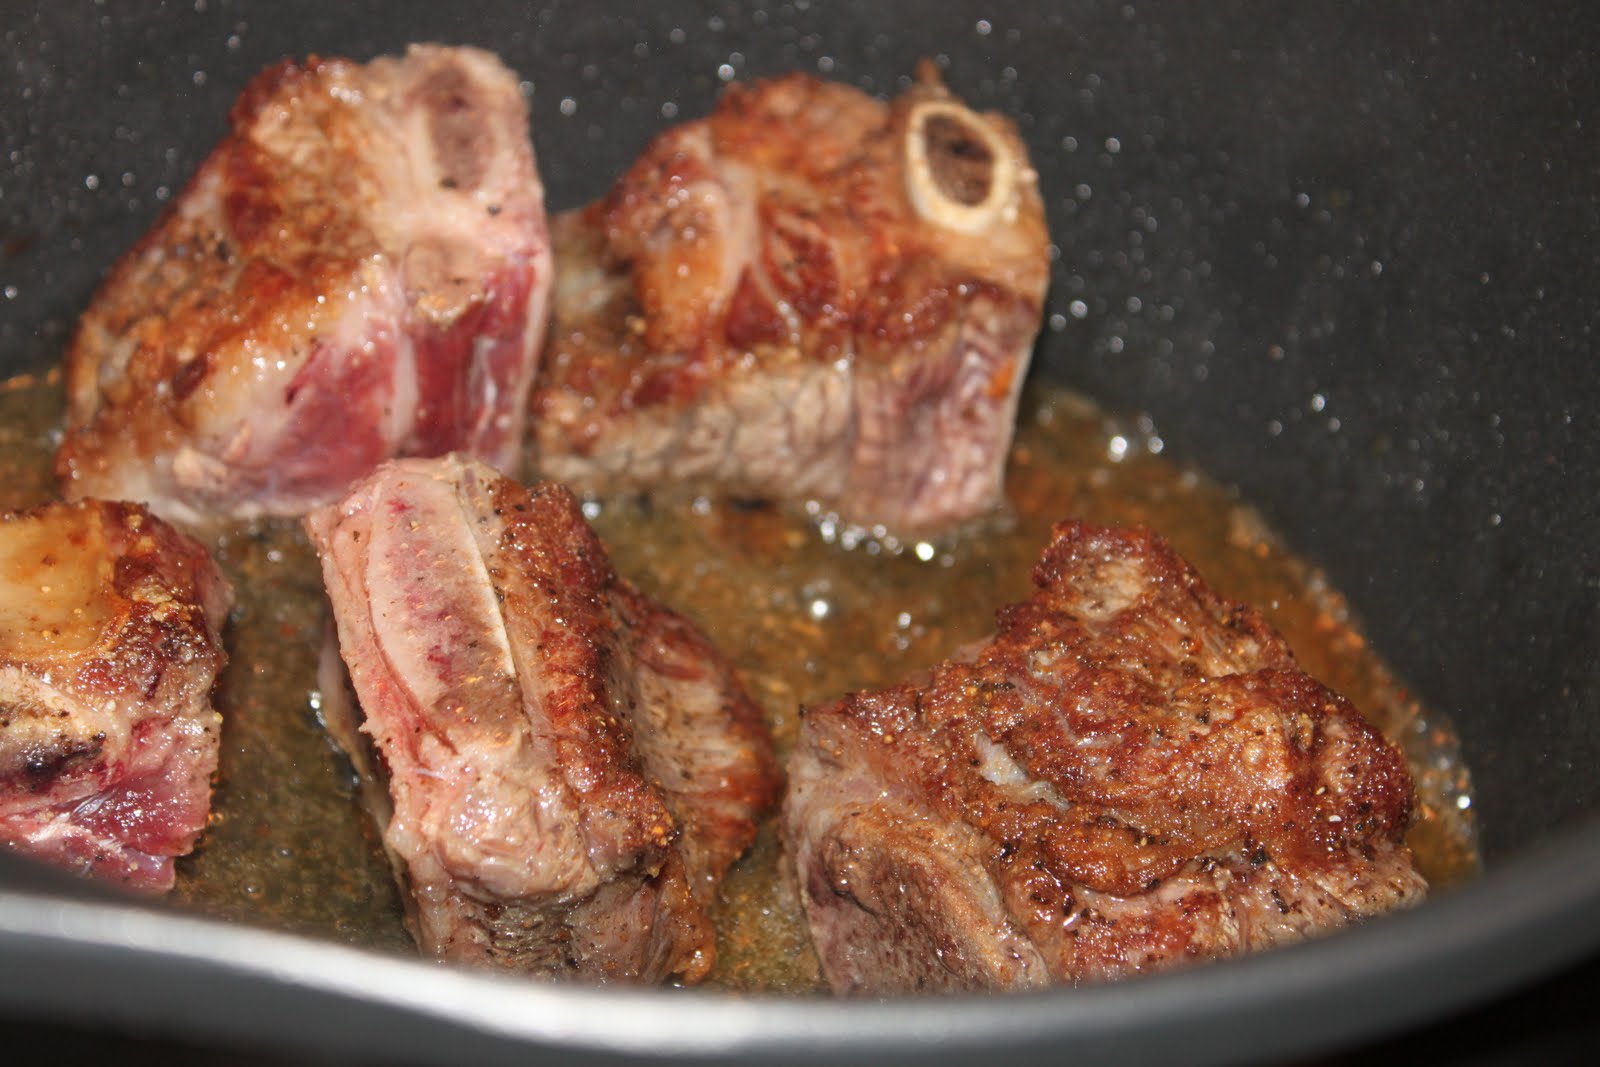
Being that I was feeling extraordinarily domestic yesterday, I decided to cook up a classic home-cookin, comfort meal.  I flipped on one of my go-to cooking movies, Julie & Julia (yes, the other one is Ratatouille... don't judge), and I decided to make (for the very first time mind you) some braised shortribs.

You will need: (serves 3-4)
For the Shortribs:
12 thickly cut shortribs
2 carrots (chopped)
2 celery stalks (chopped)
2 large yellow onions (chopped)
2 cups dry red wine
2 cups beef stock
1 can (28oz) of plum tomatoes with juices (chopped)
EVOO
Sea Salt and Pepper

For the Potatoes:
5 Yukon gold potatoes
2 cups milk
1/2 stick butter
2 heads of garlic
EVOO
salt and pepper

For the Green Beans:
Refer to previous blog for recipe!

Preheat your oven to 300 degrees.  Pat dry your shortribs with paper towel and heavily salt and pepper all sides.  In a large dutch oven, heat up some EVOO on the stove over medium-high heat.  Sear the shortribs until brown on all sides working in batches - you do not want to crowd the meat (about 10 minutes total).  Remove the seared shortribs from the pot and set aside.  Add your carrots, celery and onion to the pot and cook until soft (about 10 minutes).  Next add the wine,  use a wooden spoon to deglaze the bottom of the pot so you mix in all the flavors.  Bring the mixture to a simmer and then add your tomatoes and beef stock.  Bring the whole mixture to a simmer and add your beef back in.  Place in the oven and let the meat braise for about 3 hours (the meat should fall off the bone).

When the meat has about an hour left you can start the potatoes and beans.  For the potatoes, skin them and cut them into large chunks.  Place them in a large pot and cover with water (only use enough water to cover the potatoes).  Bring to a boil on the stove and then turn the temperature down to medium and let simmer for about 20 minutes (you should be able to penetrate the potatoes with a fork - but do not overcook them otherwise they will be too starchy).  At the same time - cut the tops off the heads of garlic, place each one in a piece of tinfoil large enough to cover the whole head and drizzle the top with some EVOO, salt and pepper.  Place them (fully covered) into the oven and let the garlic roast for about 30-40 minutes.  When the potatoes are cooked - drain them and add them back to the pot along with the milk, butter, salt and pepper and the roasted bulbs of garlic (skins removed).  Smash the mixture together with a potato masher and then use an electric mixer to whip them smooth.  Keep on low heat until ready to serve.

When your meat is ready - dish everything into a large bowl, top with some of the braising juices - serve & enjoy!

Happy Cooking :)

xo Chef Natty

Thursday, September 2, 2010

Truffled Wild Mushroom Tagliatelle


I am so ravished right now what the H is taking hubs so long to get home from work?  Since when did our prompt dinner time of 7pm become negotiable?  Is this some kind of sick joke?  Not impressed. However, my uncontrollable hunger has inspired me to blog about food rather than eat whatever I can find in my fridge and consequently ruin the dinner I will eat when hubs does get home regardless of what I stuff my face with prior to.

This pasta is good.  Make it. Eat it. You will love - trust.


You will need (serves 4 normal people - or 2 hefty eaters)
1 cup chopped Italian parsley (plus a little extra for garnish)
juice from 1 whole lemon
3-4 heaping handfuls of assorted wild mushrooms (shittake, porcini, cremini, chanterelles etc...)(chopped)
500g fresh tagliatelle pasta
Grated Parmesan cheese plus some extra shavings for garnish
4-5 cloves chopped garlic
EVOO
Salt and Pepper
1 cup dry white wine
Truffle Oil

Pour a couple tablespoons of EVOO in a large heavy bottom pan on medium-high heat and cook your garlic until soft (do not brown), toss in your mushrooms and add your parsley, lemon juice and white wine.  Let the wine reduce for a couple minutes and then reduce your heat to let the mushrooms simmer for another 5 minutes.  Right before you add in your cooked tagliatelle - season the mushrooms with salt and pepper and some truffle oil.  Add your pasta and mix through.  Add a couple tablespoons of Parmesan cheese to the pasta and mix again.

Top each plate with an extra drizzle of truffle oil, a pinch of fresh parsley and Parmesan shavings.

Serve & Enjoy!

xo

Chef Natty

Saturday, August 21, 2010

Mighty Man's Meal Part 2 - Pulled Pork BBQ Sandwiches with Coleslaw and Wedge Fries


The pictures seriously cannot do this sammy justice.  This was a little experiment i decided to throw together one night last week and it totally surpassed my expectations.  Adding it to the 'must try' list.  For an amazing messy, succulent, drippy, moist, tasty, comfort food, man's meal - this is going to be my new 'go-to' recipe.

You will need: (makes about 3-4 sammys)
For the Pulled Pork Sandwich:
1 large pork tenderloin
1 yellow onions (chopped)
salt and pepper
EVOO
4-5 cloves garlic (minced)
kaiser buns

For the BBQ sauce:
1 heaping cup of ketchup
3/4 cup pineapple juice
2 tbsp brown sugar
pinch cayenne pepper
3 tbsp red wine vinegar
1 clove garlic (minced)
1 tbsp lemon juice
1 tbsp Worcestershire sauce
1 tbsp soy sauce
1 large tomato (chopped thoroughly)

For the Coleslaw:
1/2 head of green cabbage (cored and thinly sliced)
2 carrots (peeled and grated thinly)
2 celery stalks (grated thinly)
1/2 cup cider vinegar
1 tbsp honey
salt and pepper
1/2 cup fresh parsley (chopped)
1/3 cup mayo

For the Fries:
2 Yukon gold potatoes (washed and cut into even, thick wedges)
EVOO
salt and pepper

Preheat your oven to 350 degrees.

In a bowl, combine all ingredients for your homemade BBQ sauce.  Transfer the mixture into a small saucepan over medium heat and let simmer for 15 minutes.

In an oven-safe crock pot, heat up 3 tbsp of EVOO in the bottom of of the pot.  While heating, heavily salt and pepper all sides of your pork tenderloin and then place in the hot pot on medium high heat.  Let it sear on all sides until you have a nice brown crust.  Remove the tenderloin onto a plate and set aside.  Next,  add in the chopped onions into the same pot and cook until soft.  Add your tenderloin back to the crock pot and pour your BBQ sauce over the pork.

Cover the pot and place it in the oven and let the pork slow cook for about 3 hours (flip the pork every 45 minutes or so).

While the pork is cooking - combine all ingredients for your coleslaw into a large bowl and mix evenly.  Let the coleslaw sit in the fridge for at least 45 minutes before serving.

When there is about 30 minutes left before your pork is ready - lay your potato wedges onto a baking sheet lined with parchment paper.  Toss with EVOO, salt and pepper and place in the oven with the pork. 

When your pork is ready - it should be very very tender - the meat should literally fall apart.  Remove the pot from the oven and take the pork tenderloin out on a plate until its cool enough to touch.  When it is - pull apart the pork and add it back to the pot.  Stir evenly as to coat all the pork with the BBQ sauce.  Keep mixture warm on the stove.

Turn the oven up to 400 for the remaining time the fries are in the oven ( it should be about 40 minutes total - but depending on the size of the wedges it may be a touch more - poke one with a fork to check if its done).

Lastly, in a small bowl, combine your minced garlic, salt and about 5 tbsp EVOO.  Using a brush, spread this mixture lightly over the inside of your kaiser buns.

Right before serving, when everything else is ready to go - switch your oven to broil and place your kaisers in for about 2 minutes or until the top is just toasted.

Now you are ready to put this magical plate together.  place a heaping portion of pulled pork onto your garlic toasted buns, top with your homemade coleslaw, add some extra coleslaw on the side with your fries and digggg innnn!

You're Welcome.

xo

Chef Natty

Tuesday, August 10, 2010

1 Year Wedding Anniversary Dinner Part 2 - Herb Crusted Roasted Australian Rack of Lamb with Pinot Noir Reduction


You didn't think I would JUST make homemade ravioli for such a special dinner did you?  Obviously an entire rack of lamb is the perfect digestive to follow a creamy rich pasta dish. Obviously.

For this dish you will need:
For the Lamb:
1 rack of lamb (about 8 chops)
4 tbsp Dijon mustard (or again, if you want to be super cool like me - use a specialty mustard such as the rustic mustard from The Village Cheesemonger)
4 tbsp EVOO
1/2 cup fresh breadcrumbs
1/3 cup grated Parmesan cheese
about 3/4 cup of mixed chopped fresh herbs ( i use parsley, rosemary & thyme)
salt and pepper

For the Pinot Noir Sauce:
1/4 cup of shallots (chopped)
1 1/2 cups pinot noir
1 tsp rosemary (chopped)
1 tsp thyme (stems removed)
1 tsp chives (chopped)
1 cup beef broth
1 tbsp unsalted butter
salt and pepper to taste
EVOO

To begin, preheat your oven to 425 degrees.  Salt and pepper the meat on all sides.  In a small bowl, mix together your oil and the mustard evenly.  Slather it on the meat on all sides.  In a separate bowl, mix together your breadcrumbs, herbs and cheese and then pack on the crust covering the meat.  Roast on a baking sheet in the oven for 25 minutes for medium rare.

In a saucepan, saute your shallots in a touch of EVOO.  Add you pinot noir and all your herbs.  Let it simmer and reduce for about 10 minutes.  Add your beef broth and some salt and pepper and let simmer again until your whole mixture has reduced by about half and has a thicker consistency.  A couple minutes before serving, stir in your butter.

When your lamb is ready, let it sit for 7-10 minutes before cutting.  Plate your lamb and top each one with your wine reduction.

Serve & Enjoy!

xo Chef Natty

1 Year Wedding Anniversary Dinner Part 1 - Homemade Ravioli with Butternut Squash, Mascarpone & Pancetta Filling


In light of my one year wedding anniversary with hubs - I decided to make him an at-home feast instead of dining out to celebrate this big milestone in our lives.  Obvi I photographed the entire thing so I could share everything (in step by step fashion) with all of you lovey foodies of mine.  Since I wanted to make everything from scratch - step one was getting over to William Sonoma and getting myself an old school pasta machine so I could make some fresh egg noodle sheets to make my ravioli with.  Great purchase - I highly recommend it.  Now - on to the fun part...

You will need: (makes about 24 ravioli)

For the Egg Pasta Sheets:
4 1/2 cups of all purpose flour
6 eggs - lightly beaten

For the Filling:
1 medium butternut squash - cut horizontally and seeds removed
4 cloves of garlic (ends removed but skin intact)
4 cloves of garlic (chopped)
4 shallots (chopped)
2 tbsp fresh sage (chopped)
4-5 tbsp pancetta (chopped into tiny cubes)
1/2 cup dry white wine
1 egg yolk
3/4 cup of mascarpone cheese
salt and pepper to taste

For the Cream Sauce:
6 shallots (chopped)
2 tbsp unsalted butter
2 tbsp sage (chopped)
3 cups chicken stock
2 cups heavy cream

To start, preheat your oven to 375 degrees.  Oil both halves of your butternut squash and lightly salt and pepper.  Put two garlic cloves - skins intact - in each half of the squash in the valley where the seeds were.  Roast the squash for 1 hour on a baking sheet uncovered.

In the meantime, dump your flour out on a large working surface and create a well in the middle and carefully pour in your beaten eggs (refer to photo above).  Slowly and carefully (being mindful not to break the sides of the well as the egg will run), begin adding some flour from the sides to your egg with a fork and mix it together.  Keep doing this adding more and more flour until the eggs are wet but no longer runny -you may then use your hands to work the rest of the flour in to the dough.  The dough should be moist but not sticky and uniformly mixed.  Separate the dough into 8-10 separate pieces.  Using your pasta maker - follow the instructions to feed each piece of dough through to create your ravioli sheets.  *NOTE* if you do not have a pasta maker - you can use your muscles with a rolling pin and ( still working in batches) roll out your dough into sheets.  Add more flour as your go if the dough gets sticky.  Cut the edges of your ravioli sheets so you have perfect rectangles - you should have enough dough to make about 20-24 large raviolis.


Once your squash is roasted - set it aside to cool.  In the meantime, saute your pancetta in your butter in a pan until it browns - add your chopped shallots, garlic and sage and let saute for another 3 minutes.  Add white wine to deglaze the pan and let simmer for another 2 minutes.  Remove from heat and let cool.  In a large bowl - scoop the flesh of the squash in.  Remove the skins from your roasted garlic and add to the mixture.  Add your shallot and pancetta mixture to the bowl along with your egg yolk, mascarpone cheese and some salt and pepper to taste.  Mix thoroughly.

Brush the edges of each ravioli sheet with egg as you go - put 1 tsp of filling in the middle and fold the sheet over - pressing down on all sides and making sure no air is left.  Seal all edges.   Dust them with flour and set on a baking sheet separating the layers with parchment paper to prevent sticking.

Boil a large pot of water.  While your water is boiling - saute your shallots for the sauce in butter.  Add your sage and let cook for 3-4 minutes.  Add your chicken stock and cream and reduce for about 10-12 minutes.  Add salt and pepper to taste.  When your water is boiled - add your ravioli and cook only for 4-5 minutes.  Remove with a sieve and add to your sauce mixture.  Sprinkle with a little Parmesan (or if you want to get super fancy - use freshly grated buffalo Parmesan from The Village Cheesemonger like I did).

Serve & Enjoy!

Stay tuned for Anniversary dinner part two!

xo Chef Natty

Saturday, August 7, 2010

Tomato, Watermelon & Feta Salad


I can feel the winter chill is upon us.... ok not really because its been so friggin humid lately but let's get real - its only a matter of days before we start seeing "chance of flurries" on the weather network.  So let's keep it fresh a little while longer and try out a fabulous summer salad.

You will need:
Fresh assorted tomatoes (red, yellow, green, orange) (sliced in half)
1/2 cucumber (sliced)
1/4 seedless watermelon (chopped into 1 inch cubes)
1/2 cup crumbled feta
1 small red onion (sliced length wise)
2-3 tbsp EVOO
2 tbsp Balsamic Glaze
Salt and Pepper to taste

Combine all ingredients in a bowl and mix evenly.  For an extra sweetness add an extra small amount of the balsamic glaze on each plate before serving.

Great with summer BBQ's or just as a healthy lunch!

xo Chef Natty

Tuesday, August 3, 2010

why i don't "cook" from pre-made boxes

Just a little demo of what happens when I attempt to make something out of a box. 

Ok fine - the fact that it was 4am after my 25th birthday celebration and way too much vino obviously did not help the situation... but still.

Voila foodie followers - observe Delissio pizza a la Chef Natty.