Wednesday, December 15, 2010

Santa's next stop? The Village Cheesemonger of course!

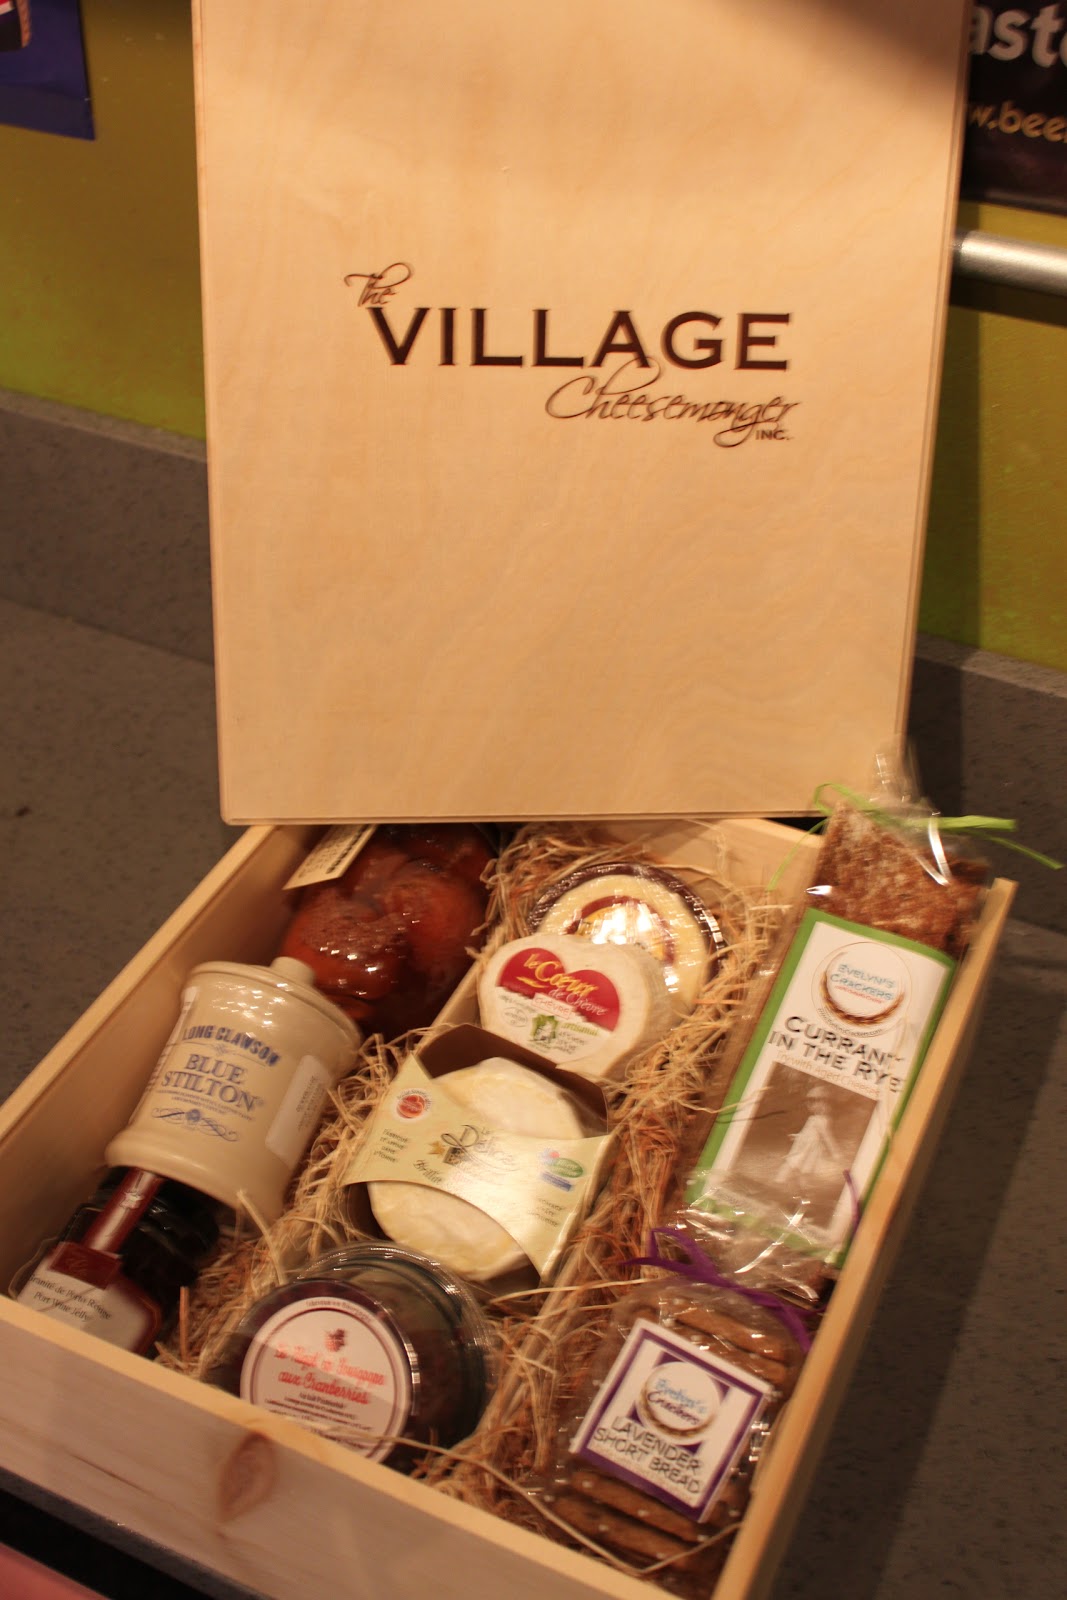
It's beginning to look alot like.... Christmas Partiessss.  And what goes hand in hand with a great party?  A great hostess gift obvi.  Only this year, why not swap the bottle of Merlot for your lovely party host with a specialty olive oil or vintage balsamic vinegar?  Thinking of putting together a gift basket?  The Cheesemonger has hand crafted wooden, inscribed boxes ready to fill up with anything your heart desires.  Fill it up with all cheese - mix in some crackers, chocolates & chutneys - or leave some room to add in a bottle of wine!

These cheese boards have been a fan favorite this year for gift giving - especially around the holidays.  They are all re-salvaged wood from Toronto.  tres sexy.

Note the assorted chocolate fondue sets...

I must have had about a million hot chocolates in my life thus far - being that it was mine and my sister's drink of choice for many many years.  So needless to say, when this little creation graced the cheesemonger I was quite excited.  What's so special you might ask?  These little delights are wooden spoons with three different chocolates attached - warm up your milk - stir in one of these babies - cuddle up infront of a fire.... genius.  perfect stocking stuffers.

Brie bakers, goat cheese bakers and these special little handmade artisinal bakers with a yummy cheese accoutrement all tied up in a bow.     


Friday, December 3, 2010

Scarpetta's Spaghetti


NYC's amazing restaurant 'Scarpetta' has recently planted itself a Toronto location in our very own Thompson Hotel.  With an absolutely delish looking menu I was quite excited to find the recipe for their famous spaghetti in The Star.  So alas, another non chef natty original makes it to my blog.  But considering my desire to keep this blog as original as possible, that must mean that this Spaghetti recipe is SUPER special (as was Mario Batali's Bolognese).  Otherwise I would spare myself the ego hit.  Nevertheless I consider it my job to provide my little foodie lovers with the best recipes - so I will wipe the bratty pout off my face one more time and share this little gem with you .... but i am not happy about it...

You will need: (serves 4)
500g Spaghetti or Bucatini (I used Bucatini)** cook 7/8 of the way to al dente and then set aside, reserving some of the starchy pasta water for later**
20 fresh and ripe Roma Tomatoes (peeled and seeded) **refer to previous blog on instructions how to peel a tomato)** 
10 fresh basil leaves (for oil infusion)
6 fresh basil leaves (rolled and cut length-wise
1 tsp chili flakes
1/2 cup EVOO
7-8 cloves of garlic (slightly crushed)
2 tbsp unsalted butter
Kosher salt


In a large pot at medium-high heat, add your tomatoes and a few tablespoons of EVOO.  A few minutes later, use a potato masher to mash up all of your tomatoes and bring down to a simmer.  Let the sauce cook for about 30-40 minutes adding salt to taste.  At the same time in a separate small saucepan, all your EVOO, chili flakes, garlic and basil and let it sit at medium-low heat.  This process infuses the olive oil with these fantastic flavours.  Let this heat for about 30 minutes - it will almost come to a boil.


When your sauce is about ready - add the infused oil into the sauce (straining out the ingredients and only adding the oil itself).  Finally, when ready to serve (this step is best done one portion at a time if possible), add a couple ladles of your tomato sauce into a pan at medium-high heat and add your pasta, 1/2 tbsp butter per serving and your basil as well as a touch of the pasta cooking water.  Cook until pasta has reached al dente.


Plate, Serve & Enjoy!

xoxo Chef Natty (except not)

Thursday, November 25, 2010

The Village Cheesemonger - not just cheese.

Salamis, Charcuterie, Proscuittos oh my!


With a meat selection increasing every week - here is a little sampler of what you can put together with products from The Village Cheesmonger in Liberty Village, Toronto.  A-maz-ing.

the best spinach papardelle bolognese you will ever have. ever.


Now, though I do like to keep this blog consistent with my own personal recipe creations - I will not take credit for a dish that is not mine.  Therefore for this recipe blog, I have to give full credit to one of the best Italian Chef's in the world - Mr. Mario Batali.  I have tried some really good bolognese sauces but this one is by FAR the best one.  I'm not kidding, it is a life changing bolognese.  Makes all the rest seem like a second rate knock off of chef boyardee.  it is THAT GOOODDDD!  I was inspired to try this recipe after skimming through the Babbo website (a fabulous NYC restaurant a la Batali) and now, I don't think I will ever be able to go back to another bolognese recipe - try it and you will see.  you will allll seeeee. Layers and layers of flavour

You will need:
1/3 cup extra virgin olive oil
1/2 stick of unsalted butter
1 onion (chopped fine)
3 carrots (chopped fine)
4 celery stalks - the mirepoix (chopped fine)
4 cloves of garlic (chopped)
3/4 lb ground pork
3/4 lb ground beef
3/4 lb ground veal
Salt and Pepper
2 cups tomato paste
2 cups milk
1 1/3 cup dry white wine
Freshly grated Parmesan Cheese

 **Note - keep the lid off the pot for all beginning steps until instructed otherwise)

Start with a heavy deep bottom pot (I use my Le Cruset crock pot (a kitchen must-have that I simply could not live without).  Add your olive oil and butter and let it heat up on medium high heat.  Once your butter has completely melted - add your onion, celery, carrots and garlic.  Let cook for 25-30 minutes (do not let them brown).  Next, add your meat and season it with a generous amount of salt and pepper. Cook on a slightly lower hear (medium) stirring a few times for 45 minutes, this will render the fat out of the meat and allow the meat to brown in a very special way creating an amazing layer of flavor. You should start to hear a crackling noise towards the end.  Using a flat bottom wooden spoon, scrape up the bits that have stuck to the bottom - again - creating another layer of flavor.   Now, add your tomato paste and stir.  This will caramelize the sweetness of the tomato flavor.  Let this simmer for 30 minutes.  Add your milk (this will act as a deglaze and pick up more flavor from the pot), let this reduce for 4-5 minutes only.  Add your wine which provides a nice amount of sugar and acidity to the dish - really lower the heat at this point and put the lid on the pot.  Let cook for 1 hour.  Taste for seasoning.

The best way to pair this sauce is with a nice spinach papardelle pasta.  I made some homemade for this dish and it was the perfect pairing.  For a homemade pasta spinach papardelle you will need:

1 tbsp sea salt
1 cup packed fresh spinach leaves
3 1/2 cups all-purpose flour, plus extra for kneading
5 large eggs


To prepare the spinach, bring some salted water to a boil and set up an ice bath next to the stove.
Blanch the spinach leaves in the boiling water for 45 seconds. Remove with a slotted spoon and immediately place into the ice bath to cool.  Once cool, use a strainer to squeeze out the excess water. Then place onto a kitchen towel and twist to remove as much moisture as possible.

To make the dough, chop the spinach verrrry finely and then combine it with the eggs in a bowl.  Mix well until smooth. Mound the flour on the countertop and make a well in the center. Add the spinach mixture. Begin to incorporate the flour, starting with the inner rim of the well. As you expand the well, keep pushing the outside edge of the flour to retain the well shape (don’t worry if it looks messy).
When half of the flour has been incorporated, the dough should begin to come together. Start to gently knead the dough with your hands to incorporate the flour. As soon as the dough comes together in a cohesive mass, set it aside. Don't worry, as you may have more than 1 cup of flour that has not been incorporated. Scrape up any dried bits of dough and leftover flour and discard.

Then lightly flour the countertop and continue kneading the dough for about 10 minutes. Dust with a bit of flour, each time the dough sticks to your hands or the counter. Scrape the counter from time to time, just to make sure any dried bits aren’t being incorporated into the dough.

After kneading for about 10 minutes, the dough should be smooth and soft and just a touch tacky, but it should no longer be sticking to your hands or the countertop. Once ready, wrap it in plastic wrap and allow it to rest for 30 minutes at room temperature.  This dough can now passed through a pasta maker to create nice green sheets.  Once you have the sheets, lightly flour and roll the sheet up into a long tube.  Using a knife, cut the pasta horizontally into papardelle noodles about 1 inch thick.

Cook for only 3-4 minutes in salted boiling water.

Combine the fresh pasta with the bolognese sauce and a touch of the starchy pasta water. Add some Parmesan cheese - serve & enjoy!

Saturday, November 6, 2010

BLD...nap......BLD.....nap.....


Here's a question.  If you found a restaurant that offered breakfast, lunch, dinner and an abundance of delish alcoholic beveys all under one roof - would it be totally inappropriate to bring a sleeping bag and camp out overnight so you can roll last nights dinner... into the next morning's breaky without the hassle of even going home? I'm thinking this is a fantastic idea - and one I am contemplating doing at Toronto's BLD restaurant.  Why bother going home when you've got one of Toronto's best chefs ready and willing to feed you buttermilk buckwheat pancakes and fresh squeezed orange juice for my morning pick-me-up - maybe a lil foie gras poutine for lunch? yes, please.  Then just finish the day off with short ribs... or maybe the miso black cod... or how about anything on the menu as long as I have a bucket of that blue cheese gnocchi on the side.  Executive Chef, Taylor Quinn takes chances with his dishes and from what i've seen - succeeds every time.  Hubs refers to himself as having a "delicate palate" and his ever so precious taste buds were dancing all night.  

The decor is very chic - top of the line everyyything with a really modern black and white color palate and a touch of pink.  Contemporary feel but still cozy and comfortable.  right up my alley. sexy bar chairs.  I almost stole one.

BLD has been open for breakfast/lunch & dinner (obvi - hence the name) for just over two months now and even has an express counter with fresh daily features.  For more info. visit their website www.bldrestaurant.com

Oh and if anyone is looking for me - I'll be napping in the fetal position with a pillow under a booth waiting for Taylor to feed me my next meal.

xo Chef Natty

Wednesday, November 3, 2010

Cheesy Chicken Enchiladas!


Saturday night's dilemma?  Option A: dressing up like a hooker on Halloween and getting elbows smashed into my face squishing through a crowded bar... Option B:  Get drunk at home with my fabulous hubby and have a Mexican fiesta theme night avec a lovely line up of horror flicks.  Option B won the race.

In light of this decision I decided to go all out and make a full out authentic Mexican feast.  Menu consisted of chips with tomatillo salsa to snack on pre-game.  Cervesas. Cornbread. Refried Beans. Mexican rice & of course - the star of the show - Chicken Enchiladasssss! The recipes for everything else are soon to come - but for now - let's master the main event first.

You will need: (makes 8 enchiladas)
2 roasted chickens (fully cooked)
EVOO
2 tsp cumin
2 tsp garlic powder
1 tsp Mexican spice blend
2 small red onions (chopped)
2 cloves of garlic (chopped)
1 cup canned corn
5 whole green chilies - canned (chopped and seeded)
4 chipotle chilies - canned (minced and seeded)
1 28 oz can stewed tomatoes
8 flour or corn tortillas
4 cups enchilada sauce
3 cups shredded montery jack, manchego and mozzarella cheese
Garnish: cilantro, sour cream & scallions

Preheat your oven to 350 degrees F.

Using your hands, shred your chicken.  In a large pan, coat it with oil and add your shredded chicken along with your cumin, garlic powder and the Mexican spice blend.  Saute for 2-3 minutes and then remove chicken and set aside.  In the same pan, saute your red onions and garlic until tender.  Add your corn, chilies (both) and stir well.  Add the stewed tomatoes and saute for another minute.  Add the chicken back into the pan and let simmer for 30 minutes.  Taste for salt.


Microwave the tortillas for 30 seconds (this helps make them more pliable).  Coat the bottom of two baking pans (or one large one) with a ladle of enchilada sauce.  In a separate bowl add the rest of your enchilada sauce.  Coat a tortilla with some enchilada sauce and then spoon 1/2 cup of your chicken mixture into it, folding, and then placing it in the pan - seam side down.  Repeat this process for the rest of the tortillas and use the extra enchilada sauce to drizzle over the top of when you are finished assembling them.  Top them with some shredded cheese and bake in the oven for 15 minutes until the cheese melts.  Garnish & Serve!


Stay tuned for the rest of the fabulous sides to this amazing Mexican fiesta feast!

xo Chef Natty

Sunday, October 24, 2010

Moroccan Spiced Couscous Stuffed Peppers


Mmmmmmmmm couscous.  Truly a middle eastern treat for all.  

Back in the spring my parents ventured out on a Moroccan adventure.  They visited with wild animals, zip-lined across a big scary hole, but most importantly, they brought their foodie daughter back some authentic Moroccan market spices.  Now, I will admit I am still unsure about some of the spices as there are no labels on them - therefore its tough to figure out how to cook with them - but I did sniff out an intoxicatingly delish cumin spice that I decided to integrate into this lovely couscous mixture.  If you do not currently either live or vacation in Morocco (as I suspect many of my readers do), using a grocery store spice will do just fine!

For these spiced treats you will need: (4 peppers)
1 1/2 cups couscous
4 peppers (whatever colors you prefer) - hollowed out and tops removed
1 large yellow onion (chopped small)
3 cups chicken stock
2 tbsp butter
3 carrots (chopped small)
2 celery stalks (chopped small)
2-3 tbsp cumin 
EVOO
handful of raisins (optional)
 
Preheat oven to 350 degrees.

Melt the butter into 2 tbsp of EVOO on medium heat in a deep bottom pan and add your onions, carrots and celery.  Let cook for 7-8 minutes and then add your chicken stock and some salt and pepper.  Raise your heat and bring the mixture to a boil.  Turn the heat off and add your couscous - cover and let sit for 10 minutes.  Add your raisins if desired.
Arrange the peppers on a baking sheet with the hollowed ends facing upwards. Stuff your peppers with the couscous mixture.  Pour about 1/2 inch of water into the bottom of the pan for the peppers to sit in and then place the pan in the oven and let cook for 1 hour.  If the tops become too brown too quick, LOOSELY tent them with some foil - however, keep in mind you want the tops to be a little crispy.

Serve & Enjoy!

xo

Chef Natty


Tuesday, October 19, 2010

Homemade Potato Gnocchi in a Rose Sauce with Buffalo Ricotta Cheese


Every once in a while I make something that I simply can't help but rave about.  OK fine - I may be tooting my own horn just a little bit on this one - but this gnocchi is a creation i was really proud of.  I know most of you might think making homemade gnocchi is a long, daunting task - but to the contrary - it actually does not take very long and the difference between a homemade gnocchi and one you buy from your local metro is like night and day.  Worth the extra work - trust.

You will need: (5-6 servings)
For the Gnocchi:
5 russet potatoes
pinch of salt
1 tsp pepper
3 egg yolks
1 cup all purpose flour - plus more for dusting
1/2 cup Parmesan cheese
pinch of nutmeg
kosher salt

For the Rose Sauce:
Classic Tomato Sauce (refer to previous blog for recipe)
1 cup cream
buffalo ricotta cheese (optional)

Preheat your oven to 425 degrees.  On a baking sheet - spread a layer of kosher salt and then place your potatoes (do not wrap in foil) on the baking sheet.  Bake for 45-50 minutes.  Set aside to cool and then when cool enough to handle, cut the potatoes in half and scoop out the flesh from the inside into a bowl (discard the skins or reserve for another use). (Note* the layer of kosher salt allows the heat to circulate 360 degrees around the potatoes).

Pass your potatoes through a potato ricer or grate them (this step is very important to ensure you have a nice smooth consistency to your gnocchi - you don't want lumps!).  In the same bowl, add your nutmeg, salt, parmesan cheese, pepper and egg yolks and mix together with your hands.  sprinkle 1/2 of your flour in the center and fold in to the dough using your knuckles (do not kneed it).  Sprinkle more flour and keep folding it in little by little until it all stays together. 

To start making the individual gnocchi dumplings, take a handful of dough and roll it out into a "snake-like" roll about 1/2 inch in diameter.  If it starts to stick sprinkle a touch more flour as your work,  Using a knife, cut evenly down the length of the dough in 1/2 inch long pieces.  Repeat this process until all your dough is used up.  Place your gnocchi dumplings on parchment paper lightly dusted with flour as you work.  Cooking your gnocchi right away is ideal - however - if you do plan on preparing them earlier and cooking on a later day, dust them with flour and let them sit in front of a fan for 30 minutes (turning at 15 minutes).  This process will allow you to freeze the gnocchi if desired or wait until the following day to cook. 

In a heavy deep bottom pan or a pot, add the cream to your tomato sauce and keep warm on the stove.  When ready to cook your gnocchi, bring a large pot of water to a boil with a tsp of salt.  Cook the gnocchi until they rise to the top and them remove them - as they rise - with a hand strainer.  Place them into the sauce and keep warm until ready to serve.  Plate your gnocchi and top each one with a dollop of buffalo ricotta (a-maz-ing cheese!  You can find it obvi at The Village Cheesemonger).  If you are using the buffalo ricotta garnish, make sure to let it sit at room temperature before serving.

Eat it. Love it.

xo Chef Natty

Wednesday, October 6, 2010

Spaghetti Carbonara


We've all had this dish to some variation or another.  It's basically bacon and eggs in pasta - how can you really go wrong?  This is a great recipe to improvise with.  For example - try poaching an egg and placing it on top of the pasta when you are ready to serve.  This looks great and it allows the eater of this amazing dish to partake in the preparation process by mixing in the egg yolk right into their dish as opposed to already having it mixed into the sauce.  For my recipe however,  I will teach you how to make a classic spaghetti carbonara.

You will need (serves 4):
spaghetti
2 large eggs
EVOO
freshly ground black pepper
6 oz thickly cut bacon (chopped)
2 handfuls fresh flat leaf Italian parsley
1 cup Parmesan cheese plus extra for garnish
8 garlic cloves (chopped)

In a bowl, mix together your eggs, black pepper and Parmesan cheese.  Set aside.  While the pasta cooks (al dente), Heat up some EVOO in a large pan and add your chopped bacon - cook for about 3-4 minutes until crispy and then remove from pan leaving the juices.  Add your garlic and saute for under 1 minute just until they are slightly soft.  Add your pasta to the pan along with the bacon and coat the pasta with the fat from the bacon.  Remove pan from the heat and add your egg mixture and toss (do not scramble).  Add half of your parsley and add some more black pepper.  Taste for salt.  Add some more EVOO if desired.  Top each plate with some more fresh parsley and some cheese.

Serve & Enjoy
xo

Chef Natty

Friday, October 1, 2010

Special K Crusted Chicken Breasts!


Before you completely disregard this recipe because of how odd it sounds - i urge you to give it a chance first before you totally deem this blog as useless.

I don't know if any of you have ever decided to have an extra healthy night and bake a plain chicken breast like I have - but it doesn't taste so great.  Especially when you try and avoid extra calories by putting no marinade, no cooking oils, no anything delicious on this chicken.  However,  I have now discovered a way to turn a plain old baked chicken breast (on a night where you are feeling particularly pudge) into something SO delish and SO healthy.  Breadcrumbs? No thanks.  I've got my breakfast cereal!

You will need (serves 2):
2 boneless skinless chicken breasts
2 cups Original Special K cereal (crushed)
1 cup plain yogurt
3-4 sprigs of rosemary (finely chopped)
salt and pepper to taste

Preheat your oven to 375 degrees F.  Mix together your "breadcrumbs", your rosemary and salt and pepper together in a plate.  Dip each chicken breast first into your yogurt (coverings the whole chicken) and then into the "breadcrumb" mixture.  Place on a baking sheet lined with parchment paper and bake in the oven for about 35 minutes.

Get the crispy crunchy taste and texture of crispy oven baked chicken but without all the extra calories you get from dipping in egg and regular breadcrumbs....... Not to say that that's not a delicious way to make chicken and if you are breading veal or making a special dinner for guests - I would still take this route.  But for a weekday healthy alternative that's sure to satisfy - try this one out!

Happy Eating!

xo

Chef Natty