Sunday, October 24, 2010

Moroccan Spiced Couscous Stuffed Peppers


Mmmmmmmmm couscous.  Truly a middle eastern treat for all.  

Back in the spring my parents ventured out on a Moroccan adventure.  They visited with wild animals, zip-lined across a big scary hole, but most importantly, they brought their foodie daughter back some authentic Moroccan market spices.  Now, I will admit I am still unsure about some of the spices as there are no labels on them - therefore its tough to figure out how to cook with them - but I did sniff out an intoxicatingly delish cumin spice that I decided to integrate into this lovely couscous mixture.  If you do not currently either live or vacation in Morocco (as I suspect many of my readers do), using a grocery store spice will do just fine!

For these spiced treats you will need: (4 peppers)
1 1/2 cups couscous
4 peppers (whatever colors you prefer) - hollowed out and tops removed
1 large yellow onion (chopped small)
3 cups chicken stock
2 tbsp butter
3 carrots (chopped small)
2 celery stalks (chopped small)
2-3 tbsp cumin 
EVOO
handful of raisins (optional)
 
Preheat oven to 350 degrees.

Melt the butter into 2 tbsp of EVOO on medium heat in a deep bottom pan and add your onions, carrots and celery.  Let cook for 7-8 minutes and then add your chicken stock and some salt and pepper.  Raise your heat and bring the mixture to a boil.  Turn the heat off and add your couscous - cover and let sit for 10 minutes.  Add your raisins if desired.
Arrange the peppers on a baking sheet with the hollowed ends facing upwards. Stuff your peppers with the couscous mixture.  Pour about 1/2 inch of water into the bottom of the pan for the peppers to sit in and then place the pan in the oven and let cook for 1 hour.  If the tops become too brown too quick, LOOSELY tent them with some foil - however, keep in mind you want the tops to be a little crispy.

Serve & Enjoy!

xo

Chef Natty


Tuesday, October 19, 2010

Homemade Potato Gnocchi in a Rose Sauce with Buffalo Ricotta Cheese


Every once in a while I make something that I simply can't help but rave about.  OK fine - I may be tooting my own horn just a little bit on this one - but this gnocchi is a creation i was really proud of.  I know most of you might think making homemade gnocchi is a long, daunting task - but to the contrary - it actually does not take very long and the difference between a homemade gnocchi and one you buy from your local metro is like night and day.  Worth the extra work - trust.

You will need: (5-6 servings)
For the Gnocchi:
5 russet potatoes
pinch of salt
1 tsp pepper
3 egg yolks
1 cup all purpose flour - plus more for dusting
1/2 cup Parmesan cheese
pinch of nutmeg
kosher salt

For the Rose Sauce:
Classic Tomato Sauce (refer to previous blog for recipe)
1 cup cream
buffalo ricotta cheese (optional)

Preheat your oven to 425 degrees.  On a baking sheet - spread a layer of kosher salt and then place your potatoes (do not wrap in foil) on the baking sheet.  Bake for 45-50 minutes.  Set aside to cool and then when cool enough to handle, cut the potatoes in half and scoop out the flesh from the inside into a bowl (discard the skins or reserve for another use). (Note* the layer of kosher salt allows the heat to circulate 360 degrees around the potatoes).

Pass your potatoes through a potato ricer or grate them (this step is very important to ensure you have a nice smooth consistency to your gnocchi - you don't want lumps!).  In the same bowl, add your nutmeg, salt, parmesan cheese, pepper and egg yolks and mix together with your hands.  sprinkle 1/2 of your flour in the center and fold in to the dough using your knuckles (do not kneed it).  Sprinkle more flour and keep folding it in little by little until it all stays together. 

To start making the individual gnocchi dumplings, take a handful of dough and roll it out into a "snake-like" roll about 1/2 inch in diameter.  If it starts to stick sprinkle a touch more flour as your work,  Using a knife, cut evenly down the length of the dough in 1/2 inch long pieces.  Repeat this process until all your dough is used up.  Place your gnocchi dumplings on parchment paper lightly dusted with flour as you work.  Cooking your gnocchi right away is ideal - however - if you do plan on preparing them earlier and cooking on a later day, dust them with flour and let them sit in front of a fan for 30 minutes (turning at 15 minutes).  This process will allow you to freeze the gnocchi if desired or wait until the following day to cook. 

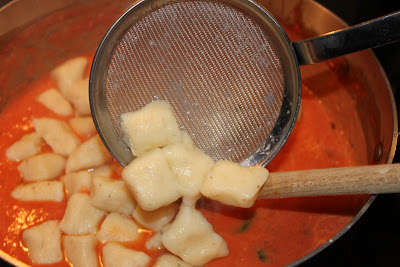
In a heavy deep bottom pan or a pot, add the cream to your tomato sauce and keep warm on the stove.  When ready to cook your gnocchi, bring a large pot of water to a boil with a tsp of salt.  Cook the gnocchi until they rise to the top and them remove them - as they rise - with a hand strainer.  Place them into the sauce and keep warm until ready to serve.  Plate your gnocchi and top each one with a dollop of buffalo ricotta (a-maz-ing cheese!  You can find it obvi at The Village Cheesemonger).  If you are using the buffalo ricotta garnish, make sure to let it sit at room temperature before serving.

Eat it. Love it.

xo Chef Natty

Wednesday, October 6, 2010

Spaghetti Carbonara


We've all had this dish to some variation or another.  It's basically bacon and eggs in pasta - how can you really go wrong?  This is a great recipe to improvise with.  For example - try poaching an egg and placing it on top of the pasta when you are ready to serve.  This looks great and it allows the eater of this amazing dish to partake in the preparation process by mixing in the egg yolk right into their dish as opposed to already having it mixed into the sauce.  For my recipe however,  I will teach you how to make a classic spaghetti carbonara.

You will need (serves 4):
spaghetti
2 large eggs
EVOO
freshly ground black pepper
6 oz thickly cut bacon (chopped)
2 handfuls fresh flat leaf Italian parsley
1 cup Parmesan cheese plus extra for garnish
8 garlic cloves (chopped)

In a bowl, mix together your eggs, black pepper and Parmesan cheese.  Set aside.  While the pasta cooks (al dente), Heat up some EVOO in a large pan and add your chopped bacon - cook for about 3-4 minutes until crispy and then remove from pan leaving the juices.  Add your garlic and saute for under 1 minute just until they are slightly soft.  Add your pasta to the pan along with the bacon and coat the pasta with the fat from the bacon.  Remove pan from the heat and add your egg mixture and toss (do not scramble).  Add half of your parsley and add some more black pepper.  Taste for salt.  Add some more EVOO if desired.  Top each plate with some more fresh parsley and some cheese.

Serve & Enjoy
xo

Chef Natty

Friday, October 1, 2010

Special K Crusted Chicken Breasts!


Before you completely disregard this recipe because of how odd it sounds - i urge you to give it a chance first before you totally deem this blog as useless.

I don't know if any of you have ever decided to have an extra healthy night and bake a plain chicken breast like I have - but it doesn't taste so great.  Especially when you try and avoid extra calories by putting no marinade, no cooking oils, no anything delicious on this chicken.  However,  I have now discovered a way to turn a plain old baked chicken breast (on a night where you are feeling particularly pudge) into something SO delish and SO healthy.  Breadcrumbs? No thanks.  I've got my breakfast cereal!

You will need (serves 2):
2 boneless skinless chicken breasts
2 cups Original Special K cereal (crushed)
1 cup plain yogurt
3-4 sprigs of rosemary (finely chopped)
salt and pepper to taste

Preheat your oven to 375 degrees F.  Mix together your "breadcrumbs", your rosemary and salt and pepper together in a plate.  Dip each chicken breast first into your yogurt (coverings the whole chicken) and then into the "breadcrumb" mixture.  Place on a baking sheet lined with parchment paper and bake in the oven for about 35 minutes.

Get the crispy crunchy taste and texture of crispy oven baked chicken but without all the extra calories you get from dipping in egg and regular breadcrumbs....... Not to say that that's not a delicious way to make chicken and if you are breading veal or making a special dinner for guests - I would still take this route.  But for a weekday healthy alternative that's sure to satisfy - try this one out!

Happy Eating!

xo

Chef Natty